The Mustering Help
Contents
PACTS
Creating a Pact
In order to enter The Mustering and any of its events you must first have a registered account with the AUS30K website, to do that simply go here, and you may want to have a quick read about Joining the War.
Making sure that you are logged in now you simply go to the front page by clicking on the Australis Ultima Sector badge in the top left hand corner or go along to the main Mustering page. On both pages you will be presented with the available factions which you can support with your (soon to be) painted models, all you need to do is click on the image of the faction you plan on supporting for your first Pact.
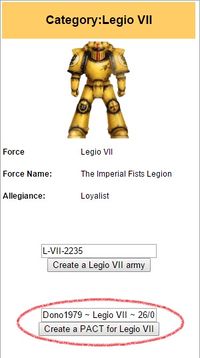
Once you are in the factions summary page you will see an Infobox on the right hand side of the screen.
There will be two buttons inside the box, the first is to create an Army for that faction (see Joining the War for more info) and the second is to create Pact on behalf of that Faction. Be sure NOT to change the name of the page you are about to create, simply press the button which says "Create a PACT....".
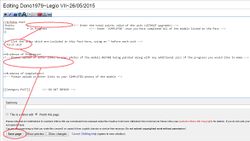
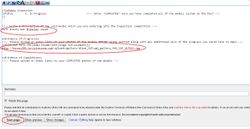
A new screen will appear with some preloaded text, be sure to only add the following pieces of text and not to change anything at this stage:
- In the first section next to points enter the total points of all of the units covered by the Pact, EXCLUDING upgrades (i.e. dont include Melta Bombs, Extra Armour, different weapons etc).
- Be sure NOT to change the Status section.
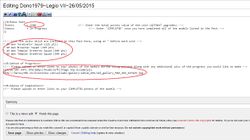
- Below that you need to list the units which are covered by this Pact and a points total next to them, again EXCLUDE upgrades, each new unit needs to have an "*" before it.
- Under the "Evidence of Progress" heading you need to provide link to images of the models before they have been painted. This can be done by providing a direct URL to where the image is hosted or you can upload the image to the site and provide an embed link, the advantage of the upload method is that it allows you to modify the size of the image. For Help on uploading and linking images go here.
- Press the "Save" button.
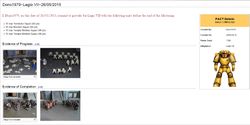
Congratulations you have created your first Pact! It should appear similar to this:
Editing a Pact
Throughout the event you may wish to update your Pact (or Pacts) with additional progress shots, this certainly isn't required but it is allowed and some people enjoy making a modelling diary of sorts. Just remember that while you can provide updates you cannot actually change the Pact itself in regards to what units and the Faction you are supporting, for that you will need to make a new Pact. You can create as many Pacts as you like and for as many different Factions as you like.
To edit an existing Pact, you need to go to the Pacts page itself and press the "Edit" button along the top of the screen. This will bring up the same page that you saw when you created the Pact in the first place. You then simply add the image links under the "Evidence of Progress" heading like you did when you created the Pact.
Completing a Pact
Once ALL of the models covered by the Pact have been completed and painted to your satisfaction you can complete the Pact and deliver the forces points to the Faction that you were supporting, contributing to their total points for the challenge. To do this you need to go to the Pacts page and press the "Edit" button along the top of the screen. This will bring up the same page that you saw when you created the Pact.
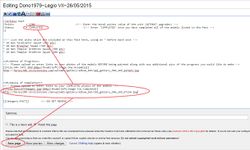
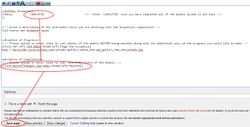
The first thing you do is change the "Status" from "In Progress" to "COMPLETED" (be sure to use all Caps as well!). Before you can save it however you need to provide images of the completed models. Scroll down to the "Evidence of Completion" heading and provide links to images of the fully painted models in the same way you did for the evidence of progress; again this can be either external linked images or uploaded images to the AUS30K site itself.
Press the "Save" button and you are done! Congratulation you have completed a Pact for your Faction!
INSPECTIONS
Creating an Inspection entry
In order to enter any of the Inspections you must first have a registered account with the AUS30K website, to do that simply go here, and you may want to have a quick read about Joining the War.
Making sure that you are logged in now you simply go to the main Inspection page by clicking on the link on the side navigation bar. On both pages you will be presented with the available factions which you can support with your (soon to be) painted models, all you need to do is click on the image of the faction you plan on supporting for your first Pact.
After making sure you are familiar with the rules for the Inspection click on the link next to the "Current months competition", this will take you through the current Inspection page summary and entry screen.
This screen will give you all of the important dates relevant to the Inspection, take note of the "Entry and Painting" dates as these are the dates during which you need to create and complete an entry. After the end date has been reached the existing entries will be locked so that they cannot be modified and voting will commence. There will be a single button, "Create a Inspection Entry", beneath the details which you simply press to create your entry.
A new screen will appear with some preloaded text, be sure to only add the following pieces of text and not to change anything at this stage:
- Be sure NOT to change the Status section.
- Below write a description of what you are entering into the competition, be sure that it matches what the current Theme is.
- Under the "Evidence of Progress" heading you need to provide link to images of the models before they have been painted along with that months Keyword which will be displayed on the Inspection page and in the forums. This can be done by providing a direct URL to where the image is hosted or you can upload the image to the site and provide an embed link, the advantage of the upload method is that it allows you to modify the size of the image. For Help on uploading and linking images go here.
- Press the "Save" button.
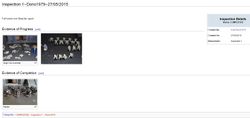
Congratulations you have created your first entry into the Inspections, good luck! It should appear similar to this:
Completing an entry into an Inspection
Once ALL of the models covered by the entry have been completed and painted to your satisfaction you can complete the entry and submit it ready for Inspection at the end of the month, ready for voting. To do this you need to go to your entries page and press the "Edit" button along the top of the screen. This will bring up the same page that you saw when you created the entry.
The first thing you do is change the "Status" from "In Progress" to "COMPLETED" (be sure to use all Caps as well!). Before you can save it however you need to provide images of the completed models. Scroll down to the "Evidence of Completion" heading and provide links to images of the fully painted models in the same way you did for the evidence of progress; again this can be either external linked images or uploaded images to the AUS30K site itself.
Press the "Save" button and you are done! Congratulations you have completed the entry, be sure to go and check out other entries into the competition and vote when the time comes!

