Lasombrachs
| Lasombrachs | |
|---|---|
 Heavily polluted mining world | |
|
Segmentum: |
Ultima Segmentum |
|
Sector: |
|
|
Subsector: |
|
|
System: |
|
|
Class: |
Mining World |
|
Type: |
Major |
 ' | |
PhysicsType Large iron/silicate Mass 8.71 x 1024 kg Density 4.53 g/cm3 Composition 34.3% oxygen, 29.1% iron, 27.8% silicon, 3.3% sodium, 2.7% other metals, 2.8% other elements |
GravimetryGravity 9.72 m/s2 Escape Velocity 12.25 km/s Rotation Period 25.82 hours Axis Tilt 5.19 ° |
AtmosphereType Thin toxic Pressure 74.40 kPa Composition 80.0% sulfur dioxide, 20.0% oxygen, trace other gases |
History
Crusade
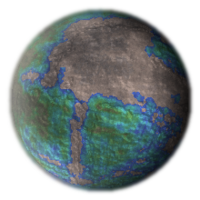
Lasombrachs is a large, murky, bleak world capturing the fog of pollution to rival the Mechanicum Borealis. Ghostly and eerie for even the most veteran of shipmasters, the giant rest behind a sister planet, Tralech, whose shards are the result of either some devastating bombardment by an unknown force or perhaps worse, some apocalyptic catastrophe from within. Who knows what cosmic gifts or curses penetrated its unnatural gravitational pull toward the shadowy world.
Records state the civilization supported solely for the industry of creating promethium, phosphex and chem munitions perhaps had dealings with more than one unknown legion in creating more than just that--weapons which never made it into any official Imperial munitions record. More data can be recalled by any force taking note of the world and its strategic importance in the wider conflict. Though Mechanicum records show the rotation of the moon be relatively quick as well as the orbit meaning it is often in the shadow of it’s dead sister, the one scholar turned remembrancer before his execution for repeated violations of the Imperial Truth swore under oath that he saw vyle, unnatural xenos apparitions there and worse, in his dreams claiming to be foresight into a world enshrouded by darkness and buried beneath the most toxic of plagues. But there are the accounts from those who dwell on Lasombrachs as to what the official designation and description show to those arriving into the system.
To any legion approaching the moon, Lasombrachs seems a dreary, fetid bog-world in the southern reaches of the Segmentum Tempestus. It is a eternally twilight Mining World with unusually high concentrations of the mineral deposits required to create devastating weaponry--now of more use than ever for all parties in the galactic civil war.
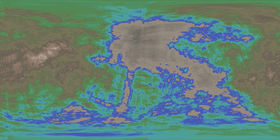
Lasombrachs lies in the shadow of it’s sister planet Tralech towards the Eastern section of the Golloch Cluster. Whilst Tralech reflects the light of Golloch’s sun Lasombrachs appears to suck it in, the great ruins of an ancient civilisation lie peacefully on Tralech’s surface having been stripped in the first age of Man’s exploration while it’s Lasombrachs was relegated in interest. When the Imperium reached out it’s hand a second time Lasombrachs was discovered to be the true gem of the two celestial bodies. Great promethium lakes lie beneath vast swathes of the surface and soon the Mechanicum had started to build a ceramite jungle in the swamp land that completely covered the planet.
As the operation expanded and great refineries started to pump their pollution into the atmosphere the already murky skies became a perma-fog that appeared almost solid at times. The swamps were already treated with distrust by the few humans that worked in the processing facilities and now they refused to leave the safety of the Mechanicum’s walls without an escort of thralls to protect them from the few creatures that still managed to eek out a life on this hostile world.
To be a miner on Lasombrachs is misery itself. The world is in a state of perpetual dusk thanks to a rogue asteroid which knocked the world from its stable orbit to the messy elliptical wobble it now inhabits. Due to long stretches outside the habitable zone of its dim star, all natural life on Lasombrachs has died and only the miners and their carefully rationed supplies remain.
That is, until, War came to Lasombrachs...
How Do I Take Part?
To take part in this campaign all you need to do is play one or more games of Warhammer 30k; Horus Heresy, and lodge a skirmish report on this site. You'll want to create an account too so you can track your victories and defeats in the campaign, as well as publish background for your army and Warlord!
Once this phase of the campaign starts you can lodge Skirmish Reports for your games here: http://aus30k.com/30kwiki/index.php?title=Skirmish_Report
Suggested Games
Although theoretically you can play any game, for those hobby fiends who want to get properly immersed, try organising one or two of the following games with your friends:
Mission 1: MINE MINE, NOT YOURS (500-1500 point games - Zone Mortalis or Centurion)
The Mines of Lasombrachs, despite being fetid and bleak, are also full of treasure for those willing to seize it. Deep beneath its polluted surface there are refining factories that take the dangerous ores and chemicals mined from Lasombrachs and made into proscribed weaponry - dangerous, but deadly effective all the same.
THE BATTLEFIELD Representing the great sprawling undermines of Lasombrachs, the table should be arrayed with restrictive terrain combining tunnels that only fit infantry to some small wider caverns that might admit a Dreadnought largest.
If you’re interesting in making some quick and dirty mine terrain, look here: http://brokencontract.blogspot.com.au/2016/06/making-mine-scenery-for-game-mats.html
If you aren’t fortunate enough to have a collection of mine-type terrain, or time to create it, a battlemat will work in a pinch: http://www.drivethrurpg.com/product/206190/Heroic-Maps--Giant-Maps-Agaricath-Drow-Slave-Mine
Prior to deployment, each player must take turns placing two objective markers each on the battlefield, using hte Rules for Placing Objective Markers.
DEPLOYMENT
Use Dawn of War Deployment for armies.
FIRST TURN
The player that set up first can choose to take the first or second turn. If they decide to take the first turn, their opponent can attempt to Seize the Initiative.
GAME LENGTH
The mission uses Variable Game Length.
VICTORY CONDITIONS
At the end of the game, the player who has scored the most Victory Points is the winner. If both players have the same number of Victory Points, the game is a draw.
Primary Objective
At the end of the game, each Objective Marker is worth 3 Victory Points to the player that controls it.
Secondary Objectives
Slay the Warlord, First Blood
MISSION SPECIAL RULES
Night Fighting - the Mines of Lasombrach have spotty illumination at best. The entire mission is under Night Fighting to reflect the limited visibility available to the combatants.
Tiny Confines - No Vehicles may be chosen for this mission, as they cannot traverse the cramped confines of the Mines of Lasombrachs.
Walkers may be used with the caveat that there may well be areas on the battlefield that they simply cannot fit!
Why We Came - Objective Markers in this Mission reflect caches of hidden experimental munitions which are dangerous to both the wielder and the target.
Whenever an Objective is first captured, roll on the chart to see what sort of munitions are discovered:
1 - Hellfire Rounds - Poisoned 2+, Gets Hot
2 - Sabot Rounds - Armorbane, Gets Hot on a 5+
3 - Mercury Rounds - Rending 4+, Gets Hot on a 4+
4 - Shatterstorm Rounds - Blast 1, Gets Hot
5 - Seeker Rounds - as if Twin Linked, Gets Hot
6 - Decimation Rounds - Rending 4+, as if Twin Linked - Gets Hot on a 3+
These rounds will work with any bolt weaponry (Bolt Pistols, Bolters, Combi-Bolters, Heavy Bolters).
There is enough to supply any single unit that is within 3” of the objective for the entire game.
Once the cache type is determined (when the first unit moves within 3” of the objective) the cache type remains the same for the entire game.
Mark it with a die or notation.
Mission 2: Capture the Orbital Elevator (1,500+ point games)
The fastest way to get munitions and fuels to conveyors is Lasombrachs sole Oribital Elevator - a miles tall cable that rockets precious cargo from the surface to a small orbital station far above. It’s capture is essential to harvest the produce of the mines.
THE BATTLEFIELD
Set up terrain as described in Preparing for Battle. Use Random Deployment Zones to determine which Deployment Map will be used for this mission. Each player rolls a D6, re-rolling ties. Whoever scores higher can decide which half of the table they wish to deploy in. The opposing player will deploy in the opposite half.
In the center of the table is the Orbital Elevator, the primary method that munitions and fuels were conveyed from the surface to orbit. Mark the elevator with a 5’ round objective. A suitable piece of terrain would be boxy cargo unit attached to a giant cable, going way, way up... but if all else fails just a Large Blast Marker will suffice.
DEPLOYMENT
Players must deploy using the Standard Deployment Method.
FIRST TURN
The player that set up first can choose to take the first or second turn. If they decide to take the first turn, their opponent can attempt to Seize the Initiative.
GAME LENGTH
The mission uses Variable Game Length.
VICTORY CONDITIONS
Primary Objective
The Primary Objective in this game is controlling the Orbital Elevator. In order to do so, at the end of the game one side must have an unbroken unit within 3” and no unbroken enemy units within 3”. Controlling the Orbital Elevator at the end of the game is worth 5 Victory Points. If the Orbital Elevator is destroyed (see below) then no player can achieve this victory and instead will be dealt a great blow to their war effort!
Secondary Objectives
Slay the Warlord, First Blood, Linebreaker.
MISSION SPECIAL RULES
Night Fighting - roll every turn, on a 1-3 Night Fighting is not in effect, 4-6 it is.
Any firing action that nears the Orbital Elevator may damage it.
If any line-of-sight is drawn to an enemy for a shooting attack is drawn over the Orbital Elevator, it might hit the cable and cause catastrophic damage.
To represent this, any firing attacks that draw line of sight across the Large Blast Marker which represents the Orbital Elevator that roll a 1...have hit the Elevator.
It is AV 13 and any Penetrating Hit will snap the cable. It collapses in a horrible metallic screech as follows:
Roll a scatter die.
Place a measuring tape (ruler, et al) from the Large Blast Marker all the way to a table edge.
Anything unit, vehicle, et al under this line takes a STR 10 DESTROYER hit.
Both sides now fight for a phyrric victory, as the riches of Lasombrachs will be that much harder to remove from the planet.
Campaign Reports
| The Second Golloch War | |||||
Prelude to WarThe Golloch Cluster is a nebulous region of space containing thousands of ..→ | |||||
Battle Reports
| Battle Name | Date | Planet | Battle Outcome | Battle Summary |
|---|---|---|---|---|
| The Second Golloch War~Battle for Lasombrachs | 332.009.M31 | Lasombrachs | Traitor |
May - Combat Phase Lasombrachs lies in the shadow of it’s sister planet Tralech towards the Eastern section of the Golloch Cluster. Whilst Tralech reflects the light of Golloch’s sun ..→ |
Skirmish Reports
- L-VIII-0381 defeated L-VI-7408 a Traitor gain.
- L-IV-1621 defeated Imperial Fists led by Sigismund a Traitor gain.
- A-MECH-4536 defeated Word Bearers Legion a Loyalist gain.
- A-MECH-0582 defeated Loyalist Mechanicum a Traitor gain.
- A-MECH-0582 defeated Orkoids a Traitor gain.
- Traitor defeated L-XVIII-0574 a Traitor gain.
- Traitor defeated L-XVIII-0574 a Traitor gain.
- Traitor defeated L-XVIII-0574 a Traitor gain.
- L-XX-1183 defeated L-XVI-Deon a Traitor gain.
- L-XVI-0949 defeated Salamanders force a Traitor, Death Guard Detachment gain.
- L-IX-2058 defeated Imperial Army a Loyalist gain.
- T-CUST-1905 defeated Deathguard a Loyalist gain.
- A-MECH-0582 defeated L-VII-2023 a Traitor gain.
- L-VII-2023 defeated A-MECH-0582 a Loyalist gain.
- A-MECH-0582 defeated L-VII-2023 a Traitor gain.
- A-MECH-4536 defeated Word Bearers a Loyalist gain.
- A-MECH-4536 fought Word Bearers resulting in a standoff.
- A-MECH-0582 defeated Loyalist Mechanicum a Traitor gain.